
You’ve written a great blog post … but it’s not driving traffic
The solution? Optimize your post for SEO.
This blog post SEO checklist will show you precisely what elements of your post you need to optimize.
But first, let’s start with understanding what blog post SEO is and why it is so important.
First, Download Your Blog Post SEO Checklist
Before you publish your next post, download this checklist and make sure you're optimizing your content the right way. Then bookmark this post as a reference you can keep on hand.
What is Blog Post SEO?
Blog post SEO is the process of optimizing your blog content to rank higher on search engine results pages (SERP).
Some of the essential tasks involved in optimizing a blog post include keyword research, internal linking, on-page optimization, and SEO blog writing.
Why is Blog Post SEO Crucial?
Blog post SEO is crucial for two significant reasons:
Lead Generation
A
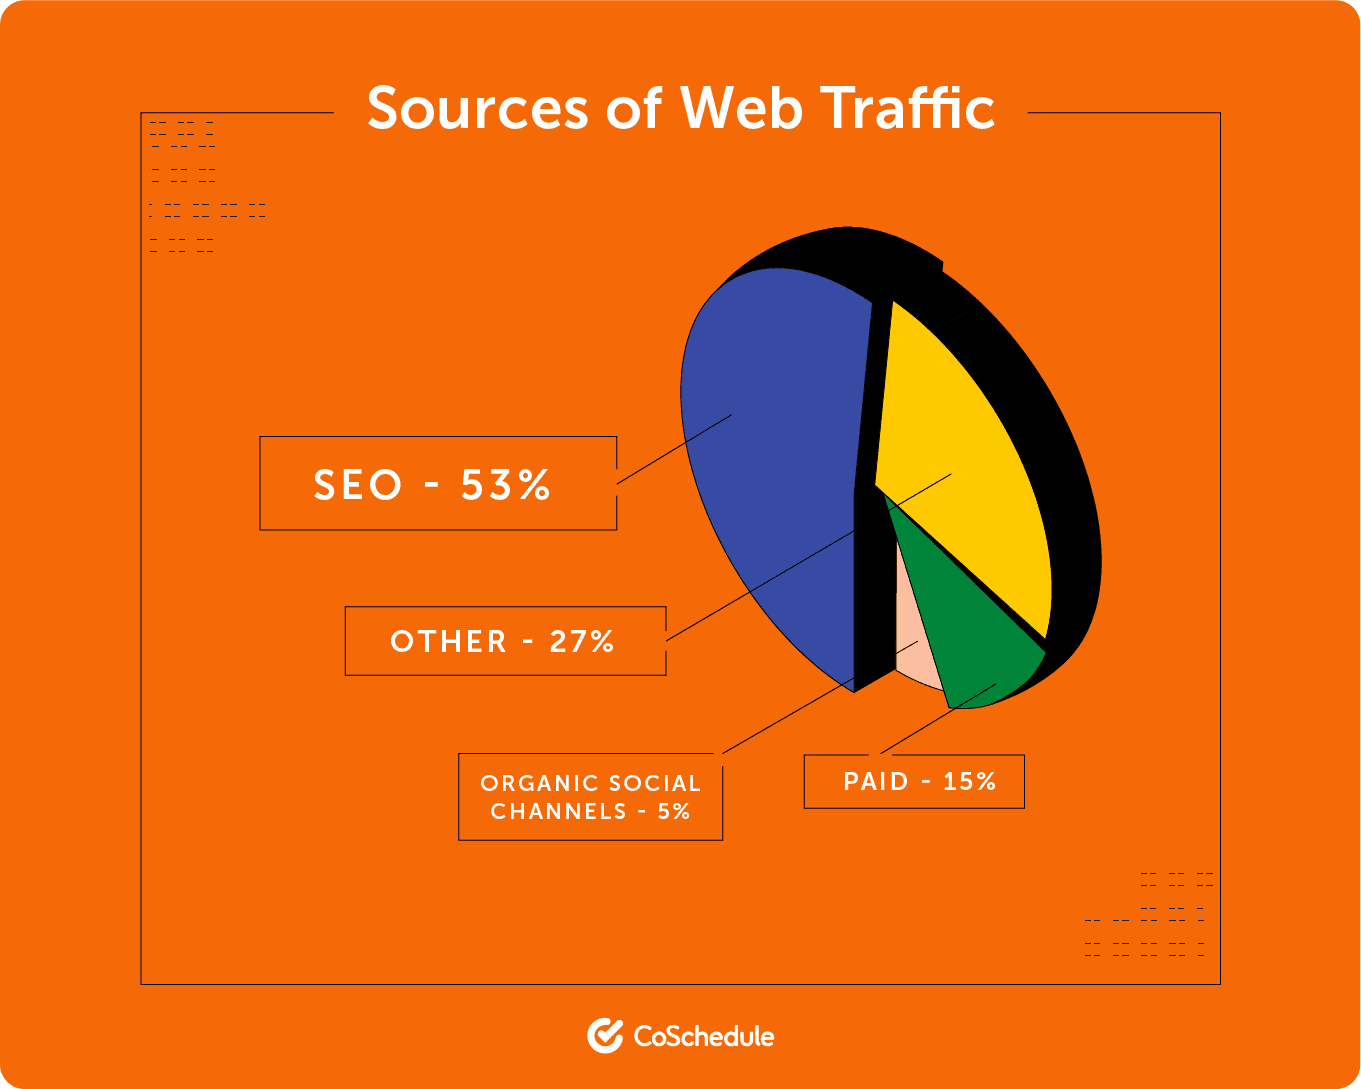
recent survey of 1067 bloggers showed that SEO is their 2nd most important method of generating traffic. Also, SEO contributes
53% of all web traffic, compared to 27%, 15%, and 5% from other, paid, and organic social channels.
Considering that
61% of online marketers struggle with lead generation, it’s essential to pay attention to your
SEO content strategy.
The more optimized your blog post is, the higher its chances of garnering traffic and potential customers from search engines like Google and Bing.
How to Write SEO-Friendly Blog Posts
A truly SEO-friendly blog post is one that readers would find valuable, and search engines would understand.
You can think of blog post SEO as building a house.
Before you start building, you need to set the proper foundation first. If the foundation is shaky, it’s only a matter of time before the building comes crashing down.
Similarly, if you want to create a blog post that generates traffic, you must lay the proper foundation.
Here’s how.
Install Yoast
 Yoast
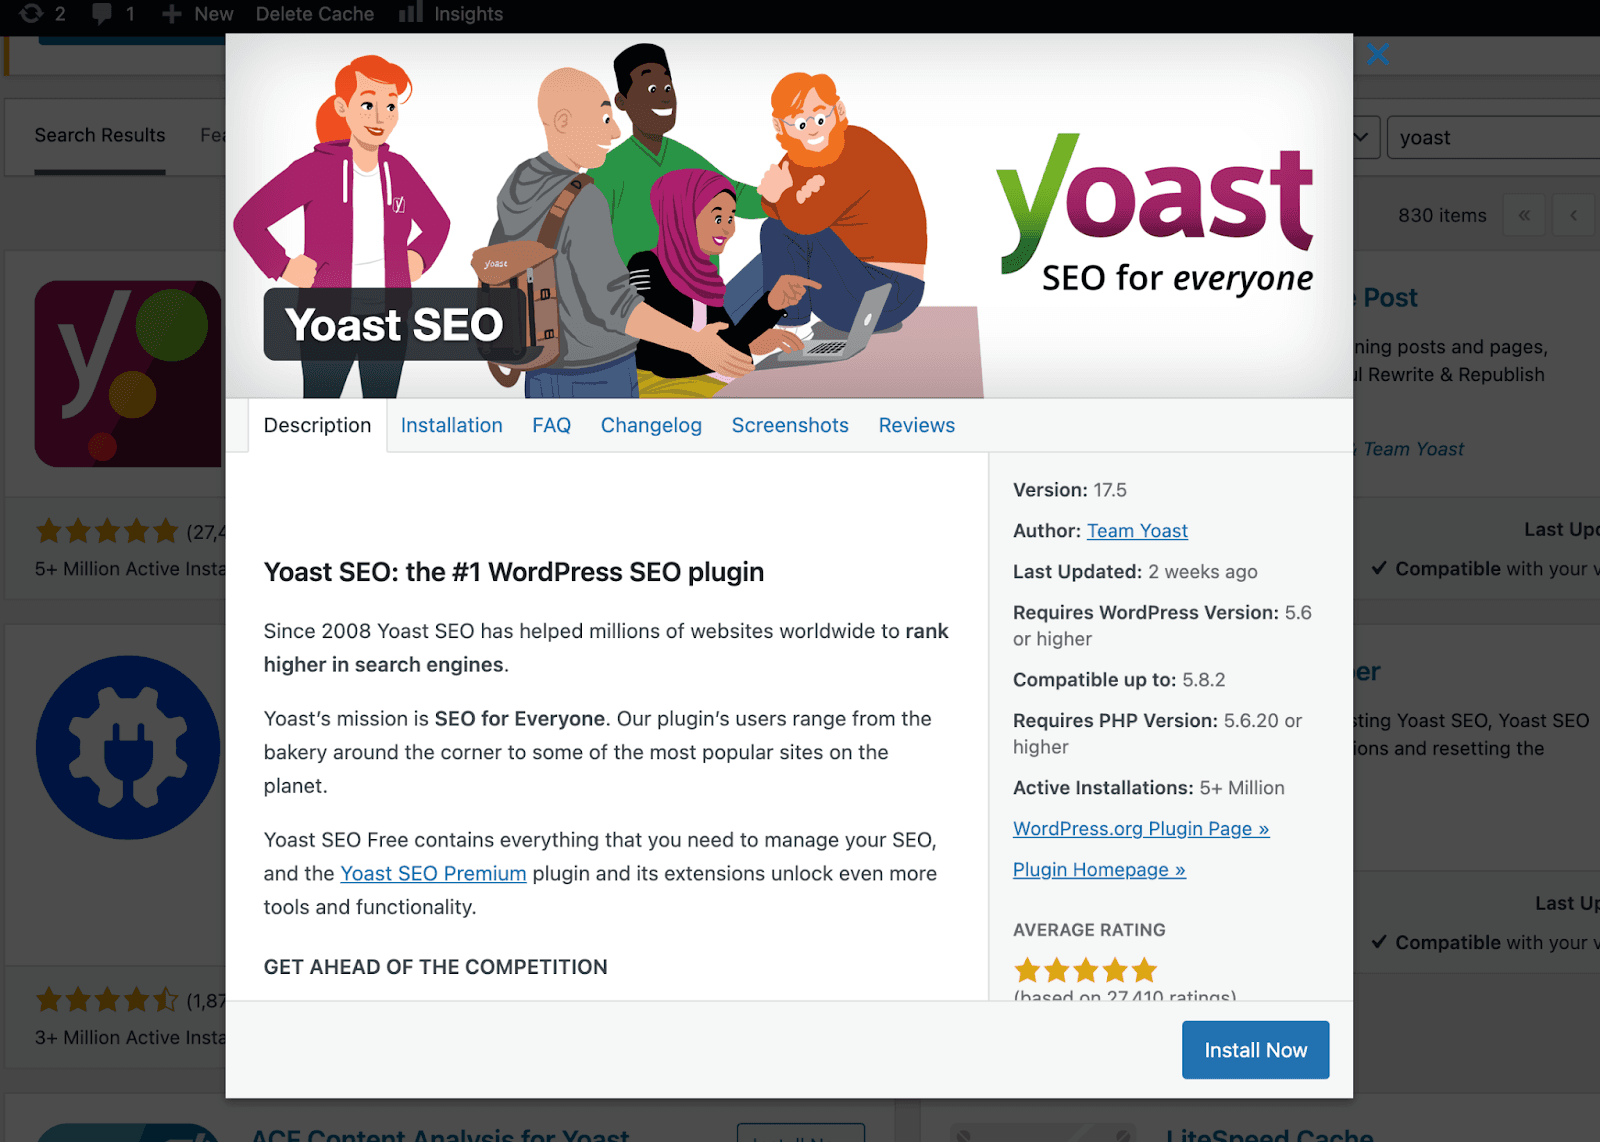
Yoast is one of the best SEO plugins for WordPress websites.
Chances are that you already have the plugin installed on your site. But if not, it’s time to install it and start enjoying the many SEO benefits it provides.
As we go on, we’ll show you how valuable Yoast can be for creating SEO-friendly blog posts and optimizing your entire website.
Note: While we use Yoast for SEO, you can install and use other plugins like
RankMath and
All-In-One SEO for your website.
Conduct Thorough Keyword Research
Once you’ve set up your SEO plugin, the next step to laying the groundwork for your blog post is to conduct thorough
keyword research.
Keyword research helps you uncover phrases or terms your audience searches for and check how difficult it would be to rank for such phrases or terms. Without it, there’s no way to know what to optimize your content for.
To get started with keyword research:
Define your primary target keyword
Your primary target keyword is the term you’re optimizing a specific blog post for. It’s best practice to optimize a blog post for only one main keyword. Trying to optimize a post for different keywords makes it harder for search engines to know what you’re writing about.
So, how can you be sure you’re targeting the best keyword for your post?
Use SEO tools
Type your target keyword into free SEO tools like
Ubersuggest or
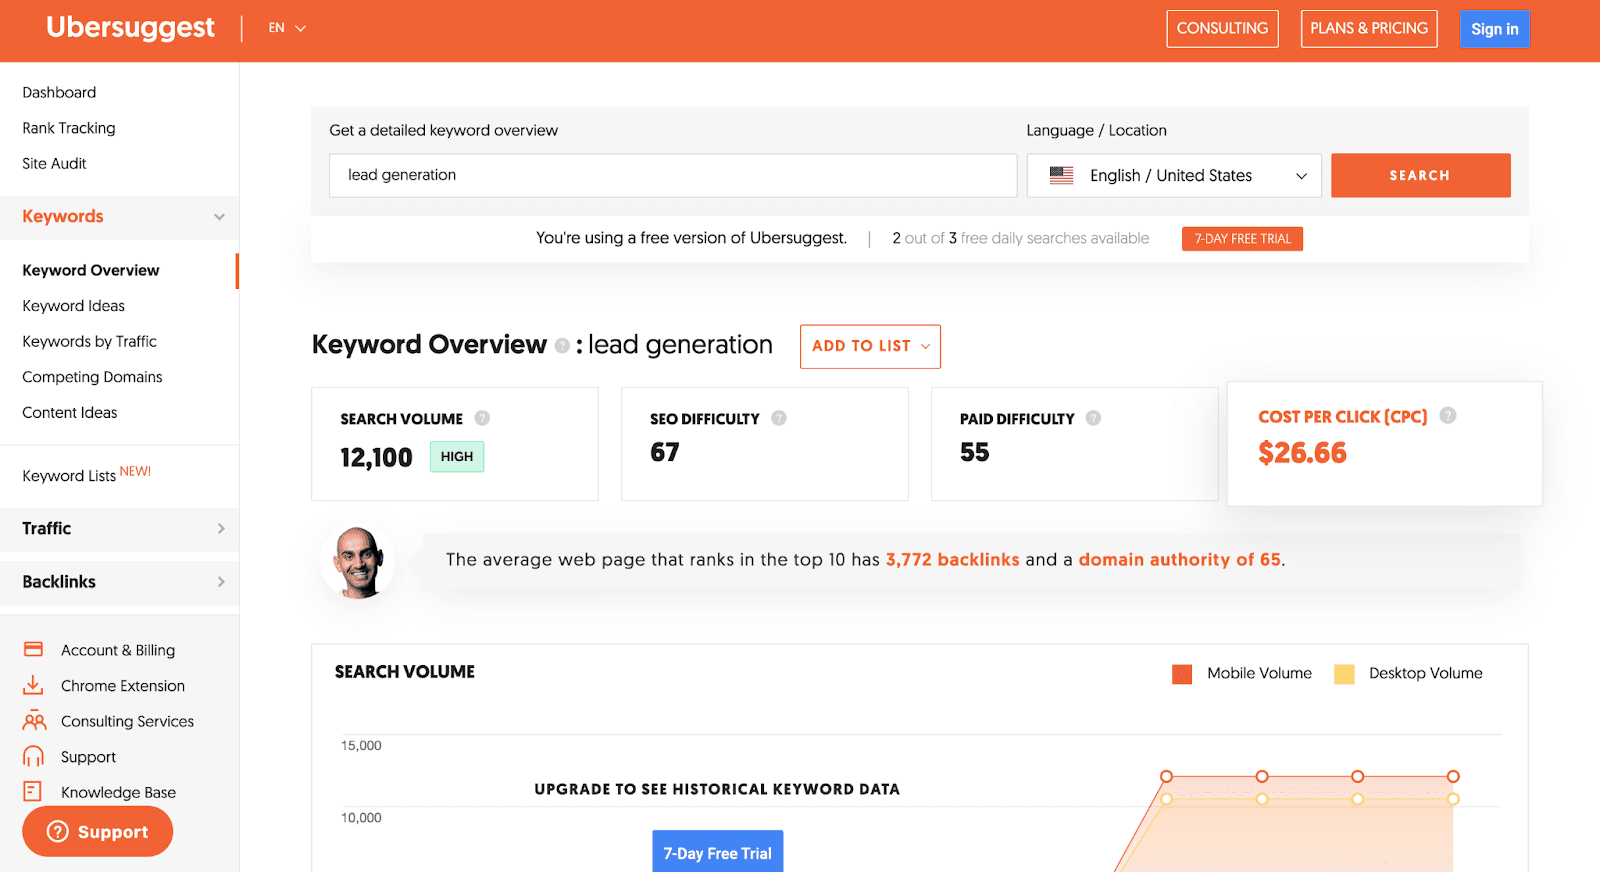
Google Keyword Planner to get valuable metrics about it, like search volume, difficulty, and relevant related keywords.
For example, let’s assume the target keyword for a post you’re writing is “lead generation.” Here’s what you’ll get when you type the keyword into Ubersuggest.
To get more detailed metrics about your target keyword, you can also use paid SEO tools like
Ahrefs,
Moz, or
SEMrush.
Understand search intent
Search intent lets you know why your audience is searching for specific keywords or phrases. Generally, search intent can be grouped into four major categories:
- Transactional intent: is when people want to buy something online. Most of the time, people who search with a transactional intent already know what they want to buy.
- Commercial intent: is similar to searches with transactional intent. However, in the case of commercial intent, the person searching is still researching what they want to buy.
- Navigational intent: is a type of search that happens when people want to visit a specific website.
- Informational intent: is when the purpose of an online search is to find more information about a particular topic.
Since Google is working hard to match search results with user search intent, it’s essential to align your blog content with the right search intent to increase your chances of ranking.
So, how can you tell what a keyword’s search intent is?
One way is to look at what’s already ranking for that keyword on Google or other search engines.
For instance, if your keyword is “blog post ideas,” Google’s search results page will show you that the keyword has an informational intent.
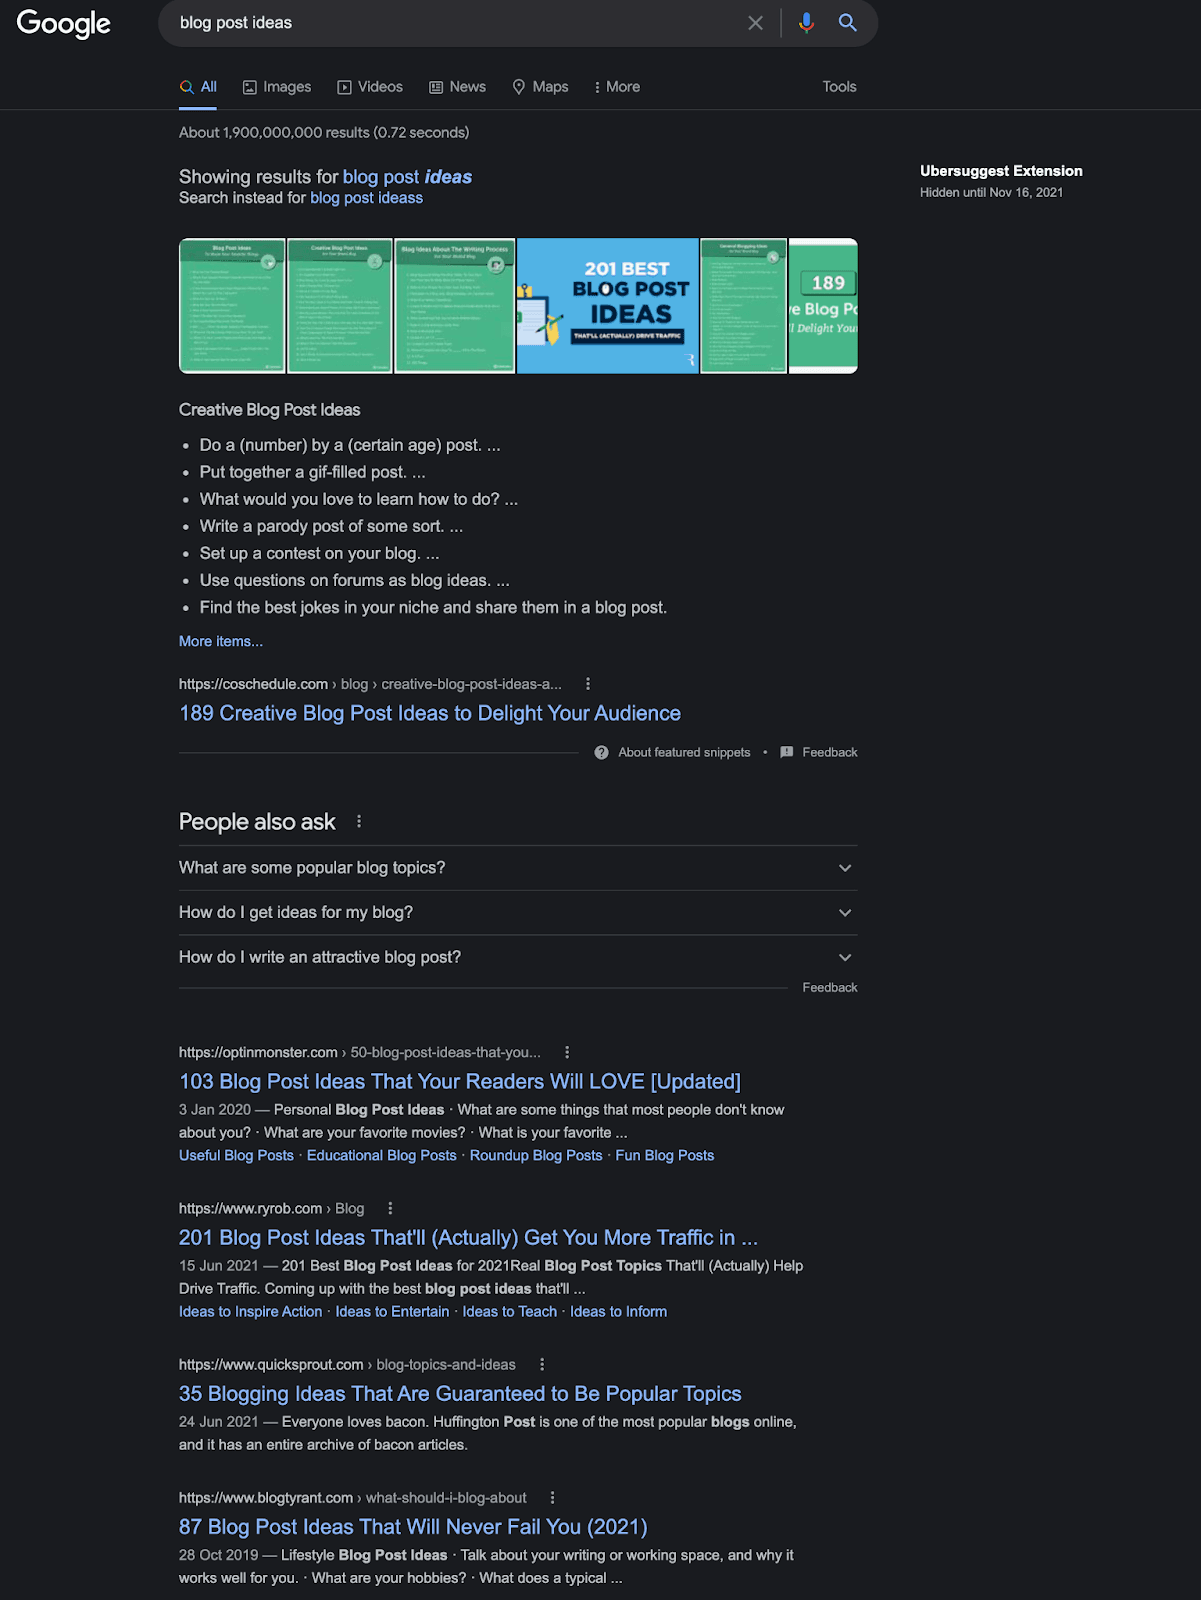
You’ll also notice that most of the posts ranking are listicles.
You can also check the “People also ask” and “related searches” sections of the Google search results to get the intent behind user searches.
Another tool you can use to uncover search intent is
Answer The Public. This tool generates and visualizes a list of questions people use when searching for a keyword.
Here’s a list of some of the questions generated for the “blog post ideas” keyword.
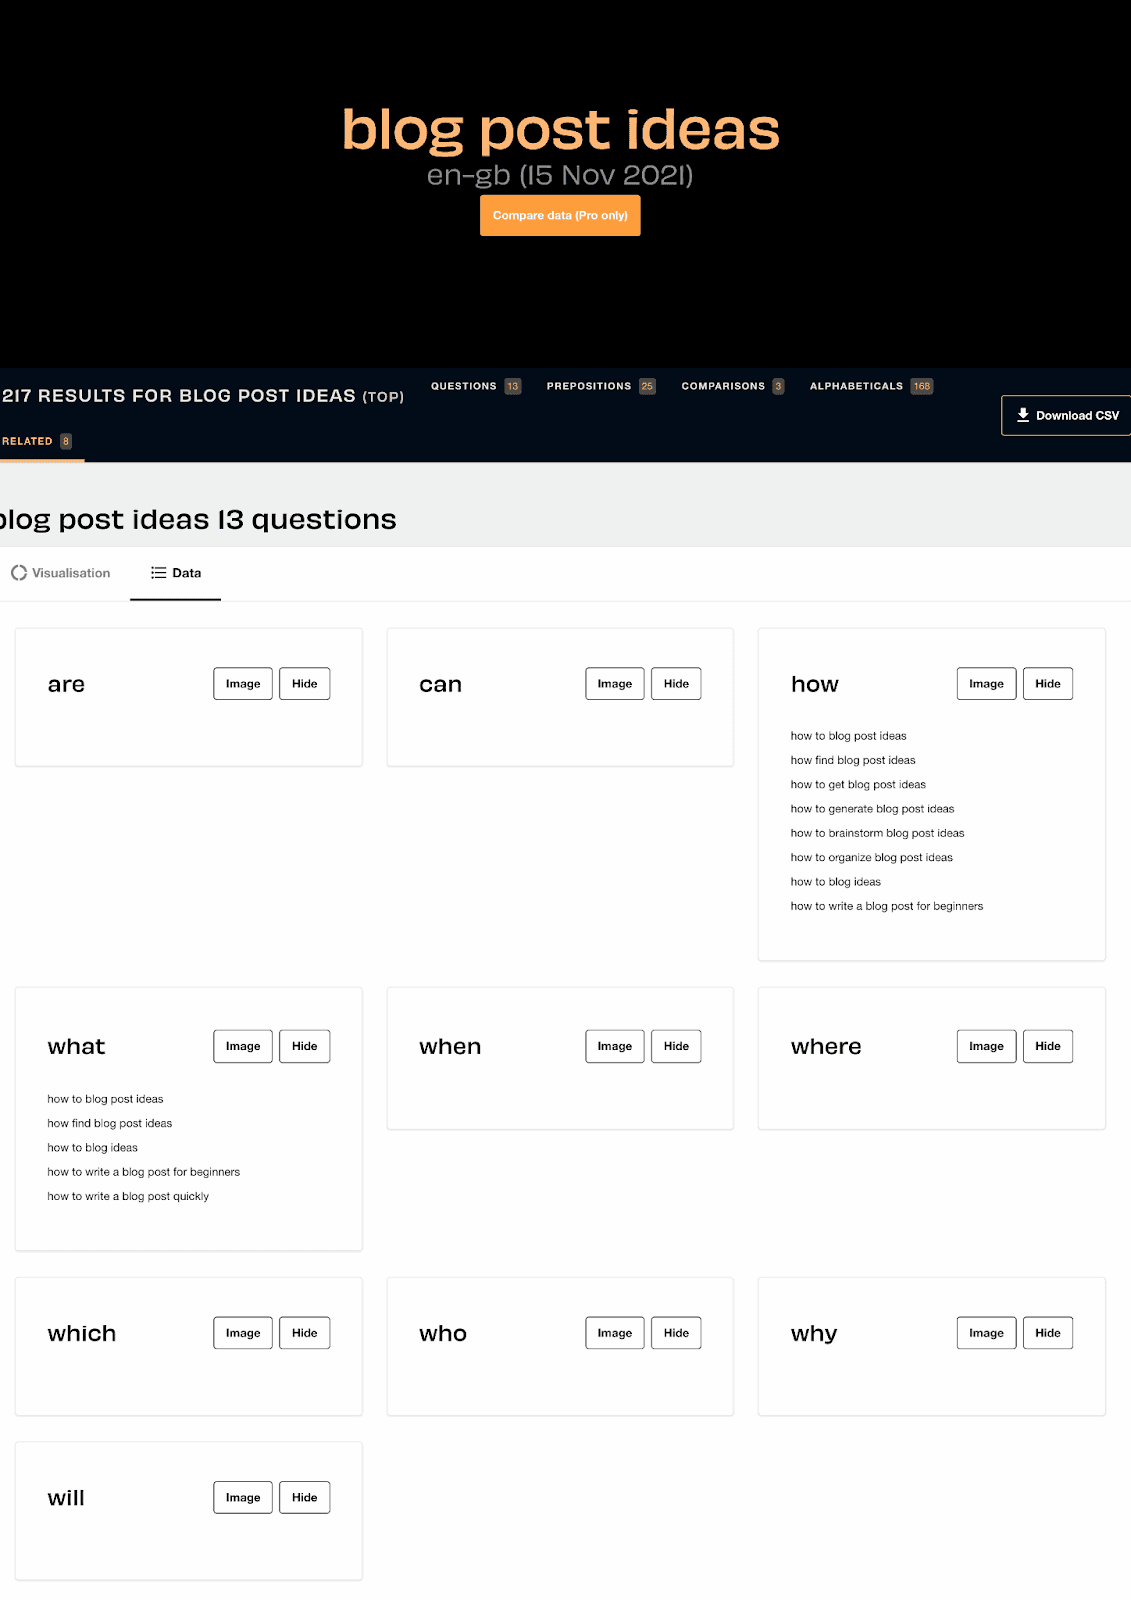
It’s pretty clear this keyword has an informational intent.
Create an outline
Without an outline, it’s easy for your content to fall all over the place without a sense of direction — even if you have amazing writing skills.
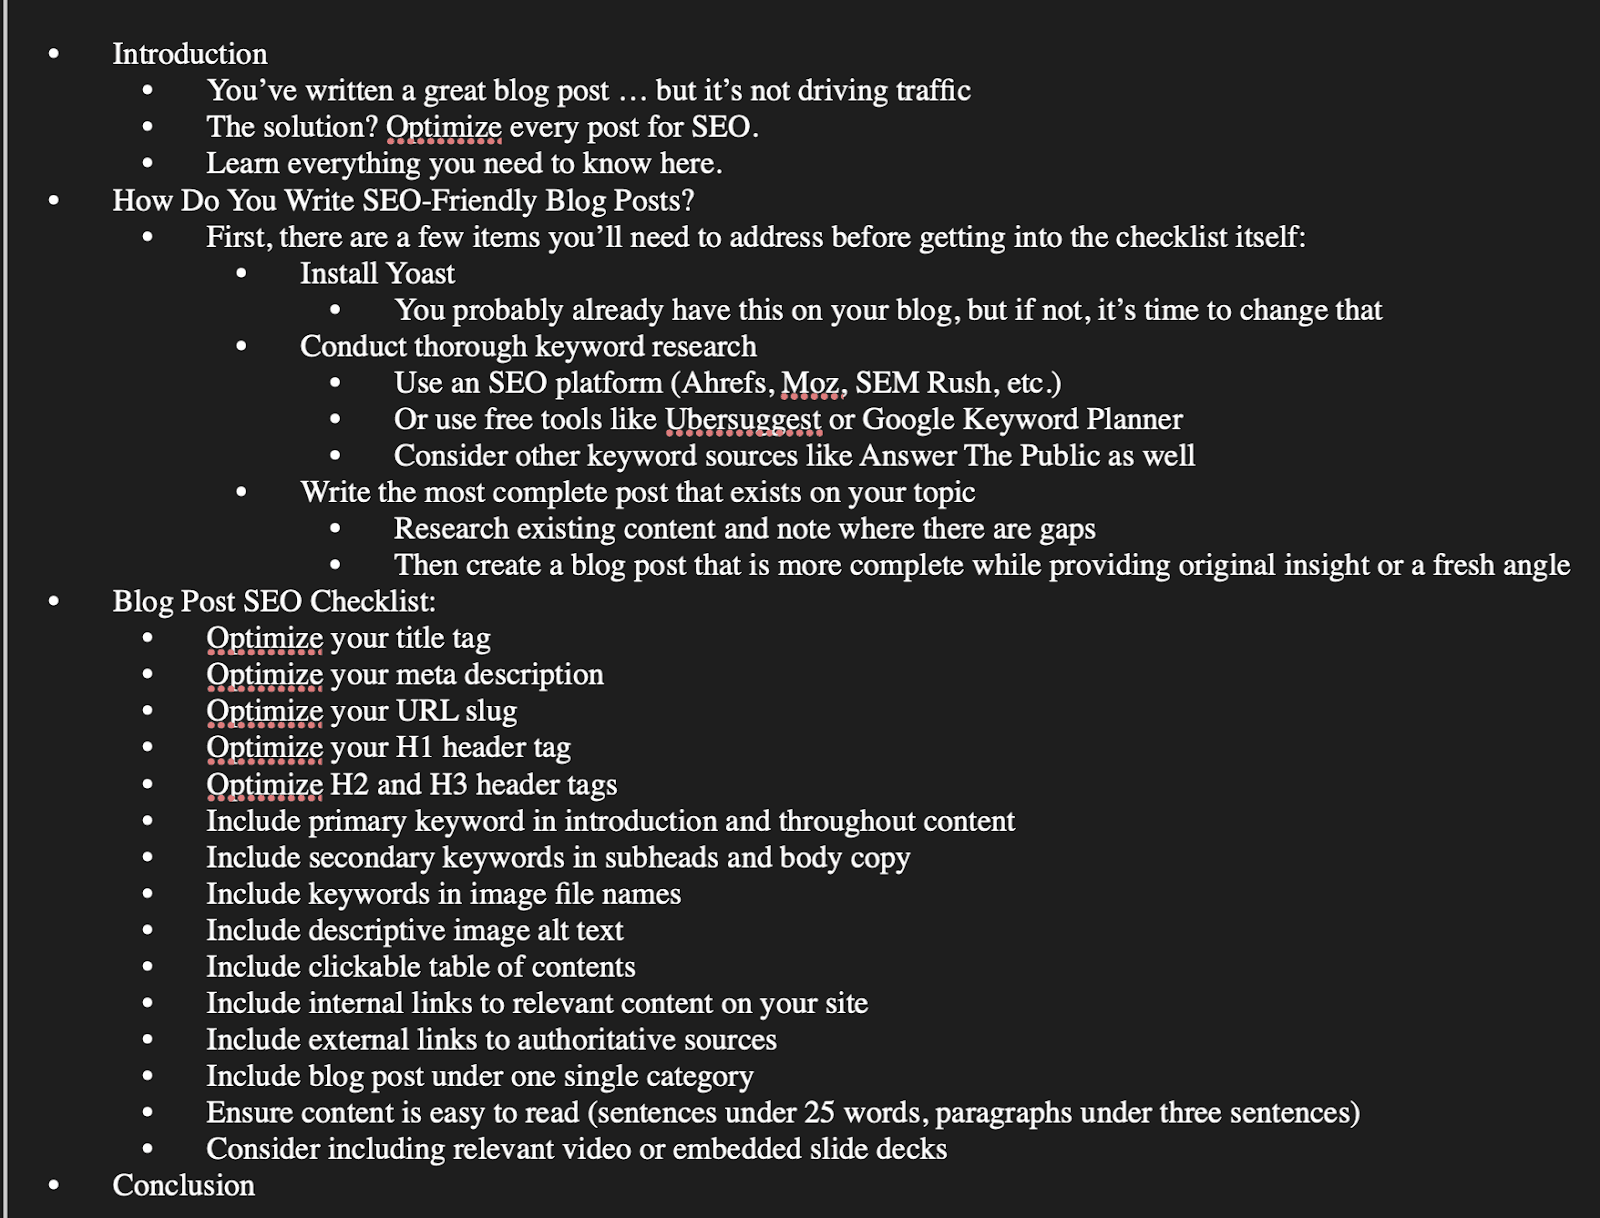
Your outline doesn’t need to be super in-depth, but it should highlight the main topic and subtopics you want to write about.
For example, here’s the not so in-depth outline for this blog post you’re reading.
Write the most complete post that exists on your topic
It’s now time to write your first draft.
To write the most complete post for your target keyword, you need to research existing content and identify common themes and gaps.
You can use
Ahref’s Content Gap tool to quickly see what keywords other pages are ranking for and the ones they’re missing.
Once you have enough information, get on to writing a post that provides original insights or a fresh angle.
Write Your Title Tag
Your post’s title tag is an essential part of your page because it shows up on the search engine results page.
If you use a poor title tag, it’s unlikely people will click through to read your post even if it ranks.
It helps to follow Google’s best practices for creating title tags. These practices include using your core keyword in the title tag and making it as descriptive as possible.

You can use
SERPsim to run a simulation and see how your title tag would appear on the results page.
To make your title tag even better, you can use
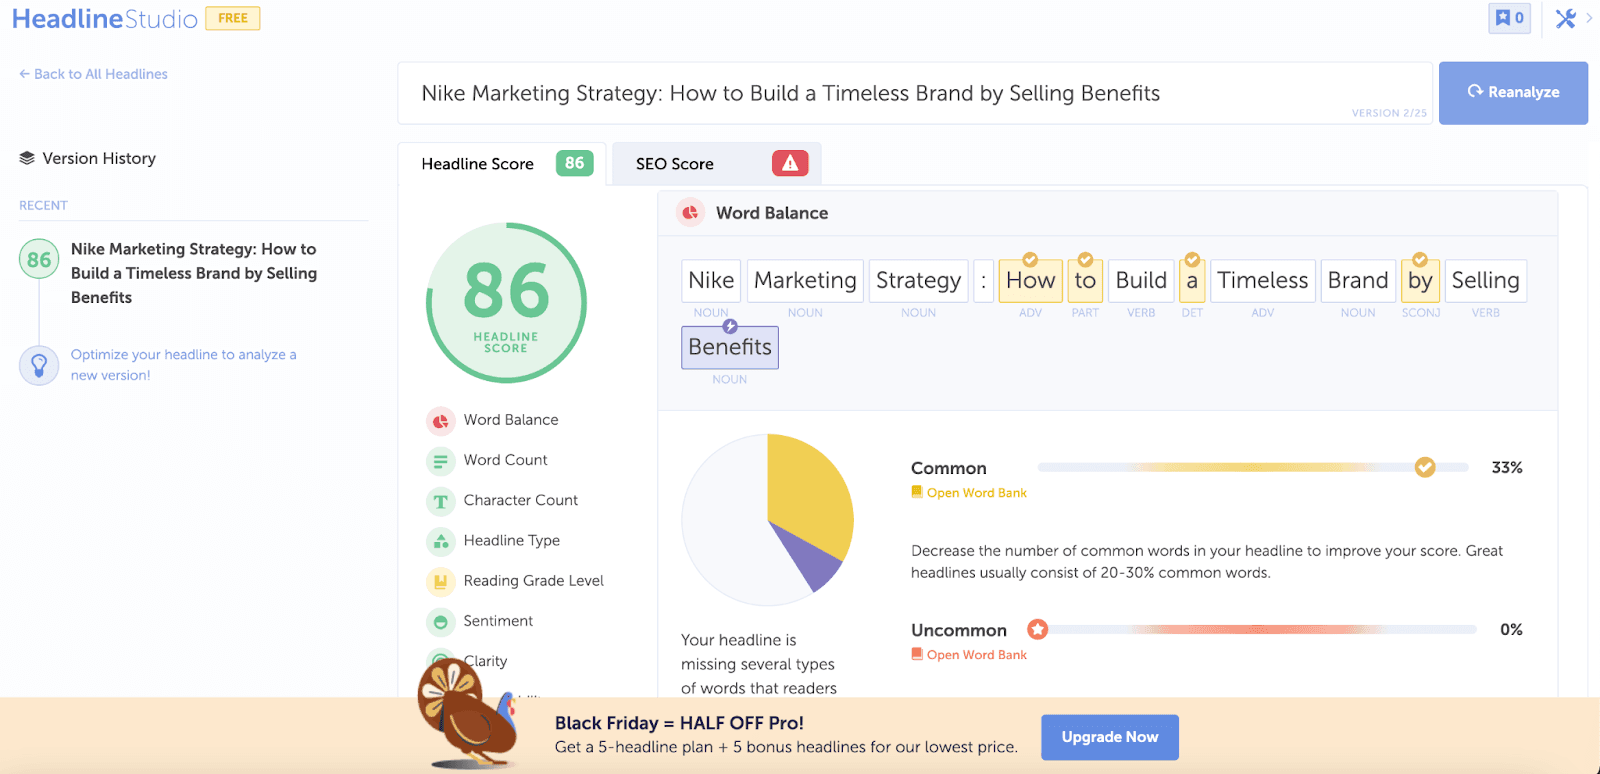
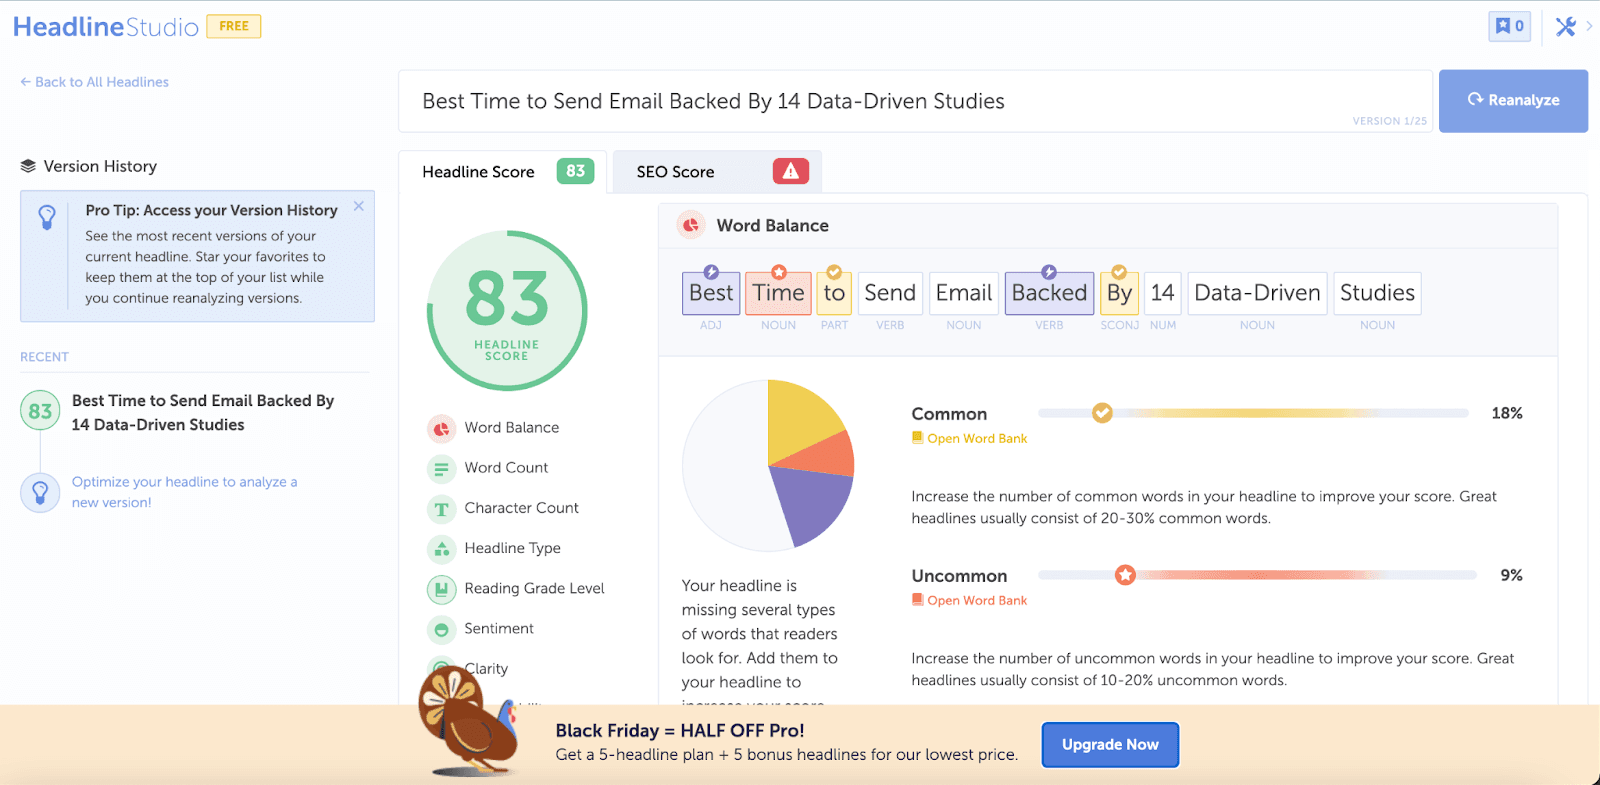
CoSchedule’s Headline Analyzer. This tool rates your headlines and titles from 1-100 based on factors like length, emotional impact, and word choice.
Here are ratings for some of the titles we’ve used here at CoSchedule.
Optimize Your Meta Description
The meta description is the blurb of text under the title tag that shows people what to expect when they open your blog post.

Although meta descriptions have no direct bearing on SEO rankings, they do affect your click-through rates.
You can optimize your meta description by making it short (less than 200 words) and including the target keyword.
Optimize Your URL Slug
Like your meta description and title tag, your URL should give people an idea of what they would find when they click on your page.
To optimize your URL slug, ensure it contains your target keyword.
If you’re using WordPress, change your permalinks default format to “post name.”

It also helps to shorten your URL slug and remove any unnecessary words. So instead of a URL like
www.coschedule.com/blog/content-optimization-how-to-help-your-content-succeed-in-12-steps, you’ll have one like
www.coschedule.com/blog/content-optimization.
You’ll also notice we use - to separate the words in the URL instead of an underscore or any other symbol. We do this simply because
search engines are designed to read only hyphens.
Optimize Your Header Tags
Header tags make it easier for search engine spiders to crawl your site and identify what it’s about. These tags also define your blog post’s structure and help people quickly read your content.
For optimization purposes, your blog post should have only one H1 header tag and should include your target keyword. Most times, the H1 is also the title tag.
Aside from your H1, you should also use other header tags, like H2s, H3s, which follow a hierarchy of importance.

Your H2s and H3s header should include your secondary keywords.
Include Primary Keyword in the Introduction and Throughout the Content
Your keyword should be in the first 100 words of your article. You should also use it in your headings. Be careful not to stuff your keyword everywhere and make your content unreadable.
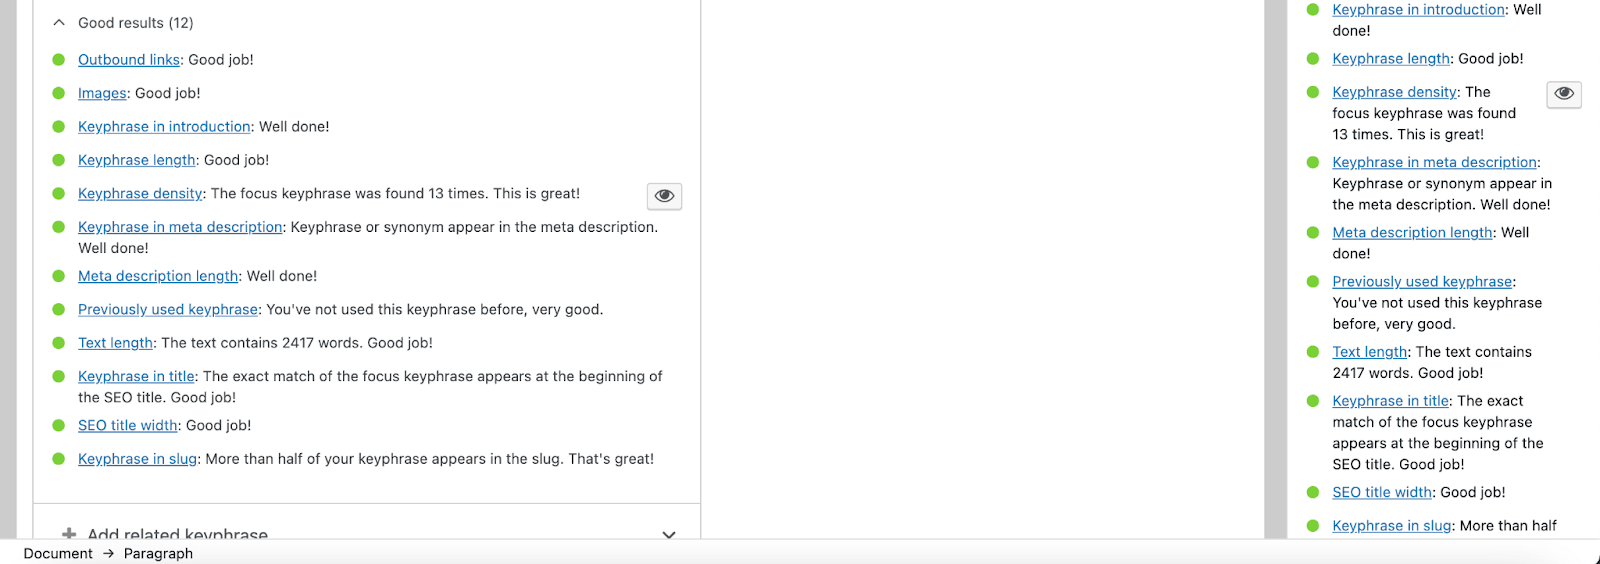
Yoast helps you track whether you’ve used your main keyword in your introduction.
Include Secondary Keywords in Subheads and Body Copy
Your primary keywords aren’t the only keywords you should include in your subheadings and blog post copy.
You also need to implement secondary keywords.
These secondary keywords add flow to your content, assist Google to understand what you’re writing better, and help you avoid keyword stuffing.
However, just like with the primary keyword, it’s best to leave secondary keywords out if it looks unnatural in your content. Remember, you’re writing for humans, not machines.
Include Keywords in Image File Names
You might think it doesn’t matter whether you change an image’s file name before uploading. After all, the file name won’t appear when people read your new blog post, right? Not at all.
Changing your image’s default file name to something descriptive that includes your target keyword gives search engines more information about your content. Thus, increasing your blog post’s chances of ranking higher in search results.
You can use a plugin like
Phoenix Media Rename to rename your image file names directly from WordPress.
Include Descriptive Image Alt Text
Search engine crawlers can’t yet read images. Therefore, whenever you use images in your content, it’s vital to use alternative texts (popularly known as alt texts).
Your alt texts should describe the image well and include your core and secondary keywords if possible.
Consider writing an alt text for this image of a red rose.

An okay alt text would be :<img src="roses.png" alt="roses">
Although this is indeed a picture of roses, the alt text isn’t descriptive enough.
Here’s a better alt text: <img src="roses.png" alt="A bouquet of beautiful red roses">
This alt text is better because it describes the image better.
Another reason alt texts are essential is that they make your content accessible to visually-impaired readers through screen readers.
Include a Clickable Table of Contents
Use a clickable table of contents to help readers jump to specific subheadings within your blog post — especially if it’s
long-form content.
You’ll need to install a plugin like
Easy Table of Contents to insert a table of contents in your post based on your header tags.
If you read our blogs, you’ll notice we use a table of contents for every content piece we publish.
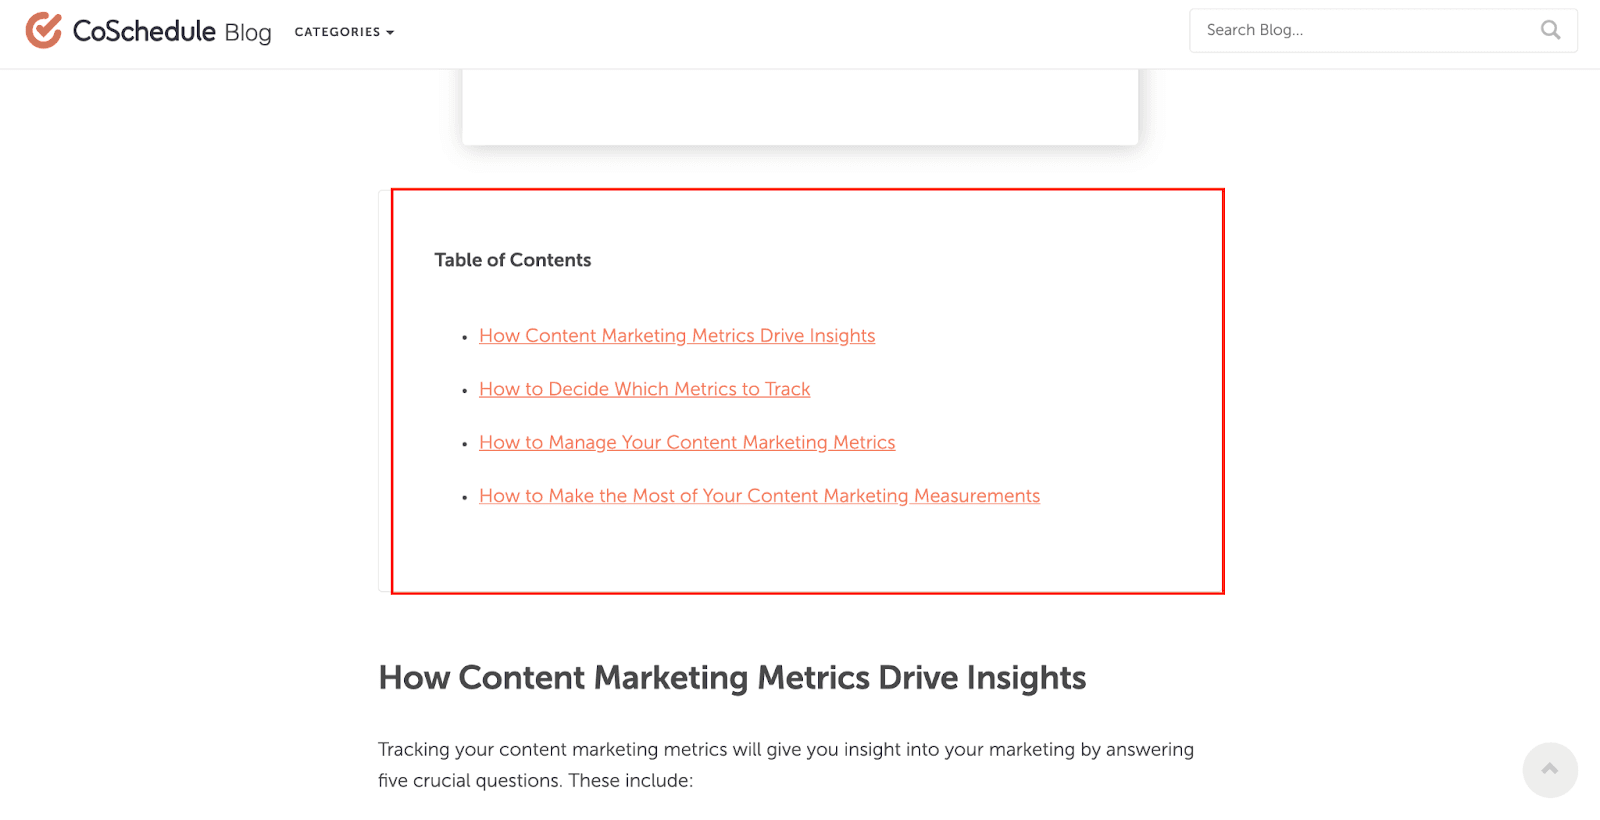
You’ll also notice we use anchor links that make it quick for you to jump to specific areas on a page.

Include Internal Links to Relevant Content on Your Site
Internal links are links from one page on a website to another page on the same website. These links are vital for SEO optimization because they help web crawlers discover more content on your website.
Internal links also provide extra content for your readers and increase the time they spend on your site—the increased dwell time signals to Google that your content is valuable and heightens your chances of ranking.
Include External Links to Authoritative Sources
To make your blog content more valuable and trustworthy, you need to link to external authoritative sources.
These
external links could be to expert research, industry statistics, and other official resources.
Include Blog Posts Under One Single Category
Keep all your posts about a particular topic under a single category or hub.
For example, if a post is about marketing, put it in the “marketing hub,” and if it’s about sales, put it in the “sales hub,” and so on.
Doing this would help Google easily associate your content with a particular topic/category and make you the authority in that category. Also, considering that all the related blog posts are under a single hub, it makes it quicker for these posts to rank.
Ensure Content is Easy to Read
Here’s how to make your content easy to read.
- Use headers and subheaders that make your post easy to scan.
- Write in an active voice.
- Make your sentences no longer than 25 words.
- Keep your paragraphs under three sentences and avoid large chunks of text.
- Replace industry jargon and buzzwords with simple and everyday language.
- Use lists, bullet points, italics, and bolded text to make your post easy on the eye.
Use
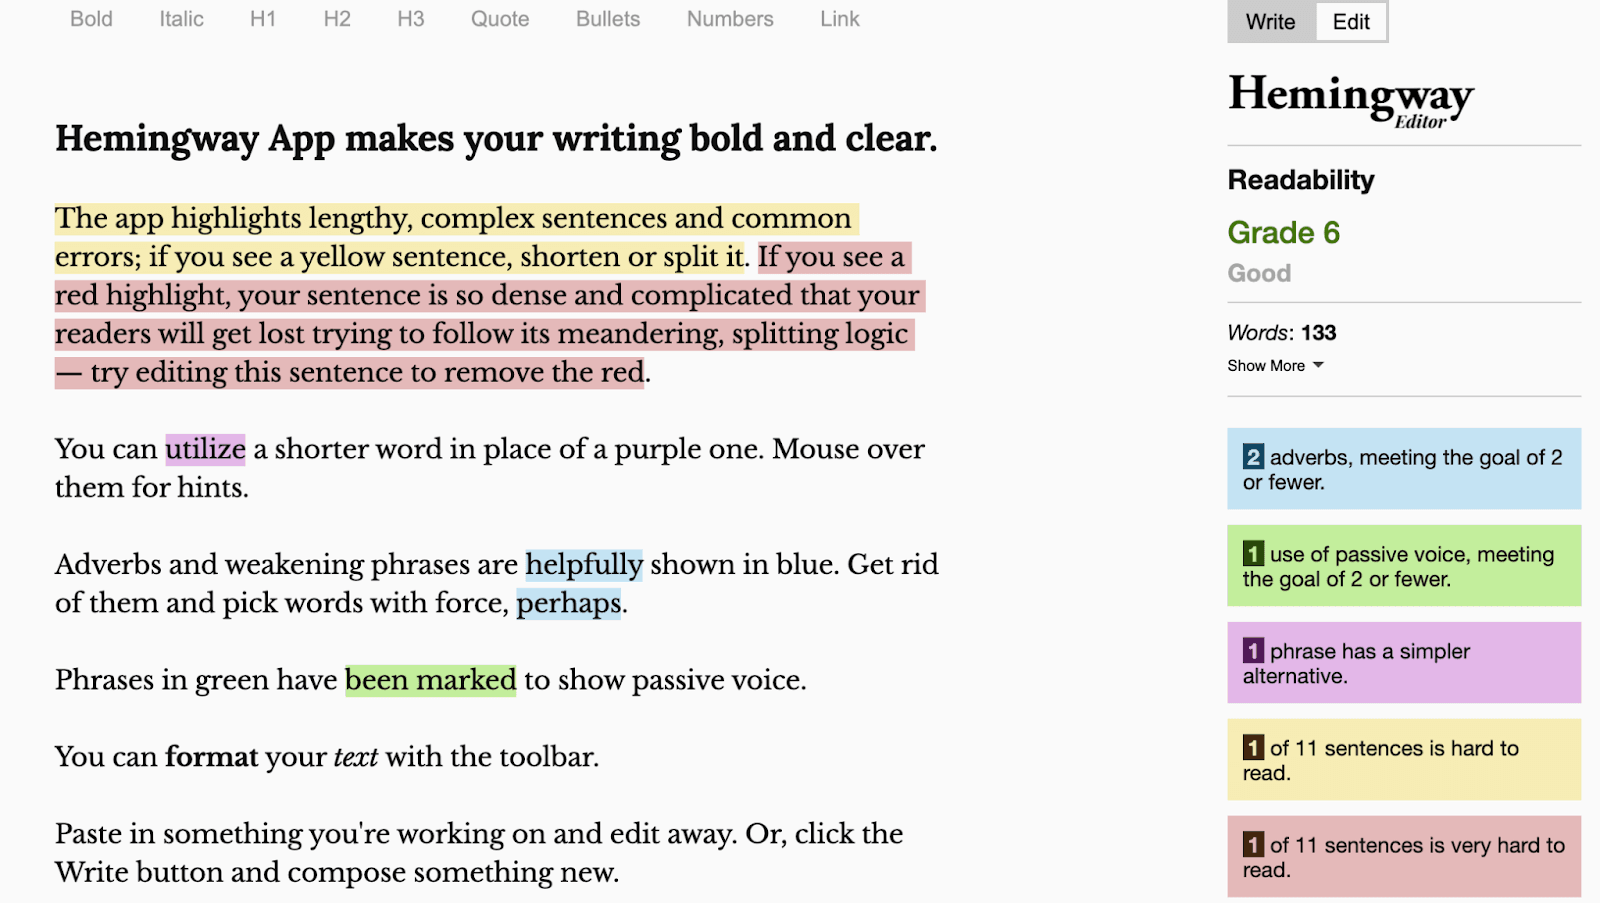
Hemingway Editor to check your content’s readability score.
Consider Including Relevant Video or Embedded Slide Decks
Media elements like videos, slides, and graphs make your content more engaging.
These media elements help to break up large blocks of text and improve your reader’s experience. They also increase the time visitors spend on your page and help readers understand your content better.
The Checklist
There you have it. A complete blog SEO checklist you can use whenever you want to create a well-optimized blog post.
Here’s a summary of the checklist:
- Start with keyword research
- Use the main keyword in your title tag, meta description, and URL slug
- Structure your blog post with header tags
- Include the main keyword in your image’s file and alt text
- Insert a table of contents and anchor texts within your post
- Add internal links within your post
- Link to external authoritative sources
- Create a content hub or group your blog posts into categories
- Make your content easy to read
- Include rich media elements like videos, slides, and graphs
Now’s your turn to start optimizing your content.
 You’ve written a great blog post … but it’s not driving traffic
The solution? Optimize your post for SEO.
This blog post SEO checklist will show you precisely what elements of your post you need to optimize.
But first, let’s start with understanding what blog post SEO is and why it is so important.
 Considering that 61% of online marketers struggle with lead generation, it’s essential to pay attention to your SEO content strategy.
The more optimized your blog post is, the higher its chances of garnering traffic and potential customers from search engines like Google and Bing.
 Yoast is one of the best SEO plugins for WordPress websites.
Chances are that you already have the plugin installed on your site. But if not, it’s time to install it and start enjoying the many SEO benefits it provides.
As we go on, we’ll show you how valuable Yoast can be for creating SEO-friendly blog posts and optimizing your entire website.
Note: While we use Yoast for SEO, you can install and use other plugins like RankMath and All-In-One SEO for your website.
 To get more detailed metrics about your target keyword, you can also use paid SEO tools like Ahrefs, Moz, or SEMrush.
 You’ll also notice that most of the posts ranking are listicles.
You can also check the “People also ask” and “related searches” sections of the Google search results to get the intent behind user searches.
Another tool you can use to uncover search intent is Answer The Public. This tool generates and visualizes a list of questions people use when searching for a keyword.
Here’s a list of some of the questions generated for the “blog post ideas” keyword.
 It’s pretty clear this keyword has an informational intent.

 You can use SERPsim to run a simulation and see how your title tag would appear on the results page.
To make your title tag even better, you can use CoSchedule’s Headline Analyzer. This tool rates your headlines and titles from 1-100 based on factors like length, emotional impact, and word choice.
Here are ratings for some of the titles we’ve used here at CoSchedule.


 Although meta descriptions have no direct bearing on SEO rankings, they do affect your click-through rates.
You can optimize your meta description by making it short (less than 200 words) and including the target keyword.
 It also helps to shorten your URL slug and remove any unnecessary words. So instead of a URL like www.coschedule.com/blog/content-optimization-how-to-help-your-content-succeed-in-12-steps, you’ll have one like www.coschedule.com/blog/content-optimization.
You’ll also notice we use - to separate the words in the URL instead of an underscore or any other symbol. We do this simply because search engines are designed to read only hyphens.
 Your H2s and H3s header should include your secondary keywords.

 An okay alt text would be :<img src="roses.png" alt="roses">
Although this is indeed a picture of roses, the alt text isn’t descriptive enough.
Here’s a better alt text: <img src="roses.png" alt="A bouquet of beautiful red roses">
This alt text is better because it describes the image better.
Another reason alt texts are essential is that they make your content accessible to visually-impaired readers through screen readers.
 You’ll also notice we use anchor links that make it quick for you to jump to specific areas on a page.


